之前用OpenCV实现了《德国心脏病》桌游的卡片识别,但效果并不是很好:视频流识别时对光线条件的要求极其苛刻,基本上是被机器玩而不是玩机器了。这让我有点恼火,CV刚刚入门的我也没啥好解决办法,只好大炮打蚊子上目标检测了,可又有问题了——深度学习要大量训练集,而这四种水果有啥好训练的?无非就是适应一下光线环境和背景,顺便变换一下角度。跟之前的无人机高空识别不同,这次的卡片识别根本没有数据集支持(想到这里就想给VisDrone团队点一万个赞,暴风感谢!)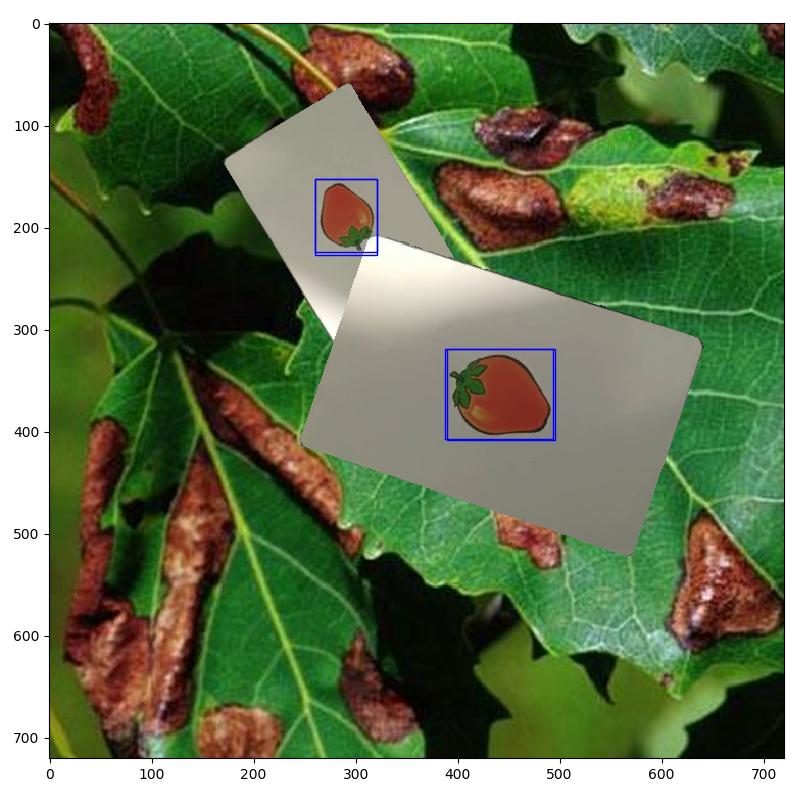
转念一想呀,咱能不能就拍四张照片或者四段视频,写段脚本让它自己旋转跳跃,顺便还能加上多样的背景使得模型能在复杂背景中表现极佳?
项目地址:Github传送门
准备工作
必要的包:OpenCV和Numpy,还有以下不常用的:
imgaug : https://github.com/aleju/imgaug
用于图片放大。
shapely : https://github.com/Toblerity/Shapely
用于笛卡尔坐标系下的图像变换与几何图形分析。用来确认一张卡片是否被另一张卡片覆盖。
tqdm : https://github.com/tqdm/tqdm
进度条工具。
Win10下Python3.5安装shapely可能报错:
    Traceback (most recent call last):
      File "<string>", line 1, in <module>
      …………
        lgeos = CDLL("geos_c.dll")
      File "g:\python\pyhton36\lib\ctypes\__init__.py", line 348, in __init__
        self._handle = _dlopen(self._name, mode)
    OSError: [WinError 126] 找不到指定的模块。
可以进入https://www.lfd.uci.edu/~gohlke/pythonlibs/#shapely手动下载对应Windows和Python版本的whl,pip install *.whl手动安装。
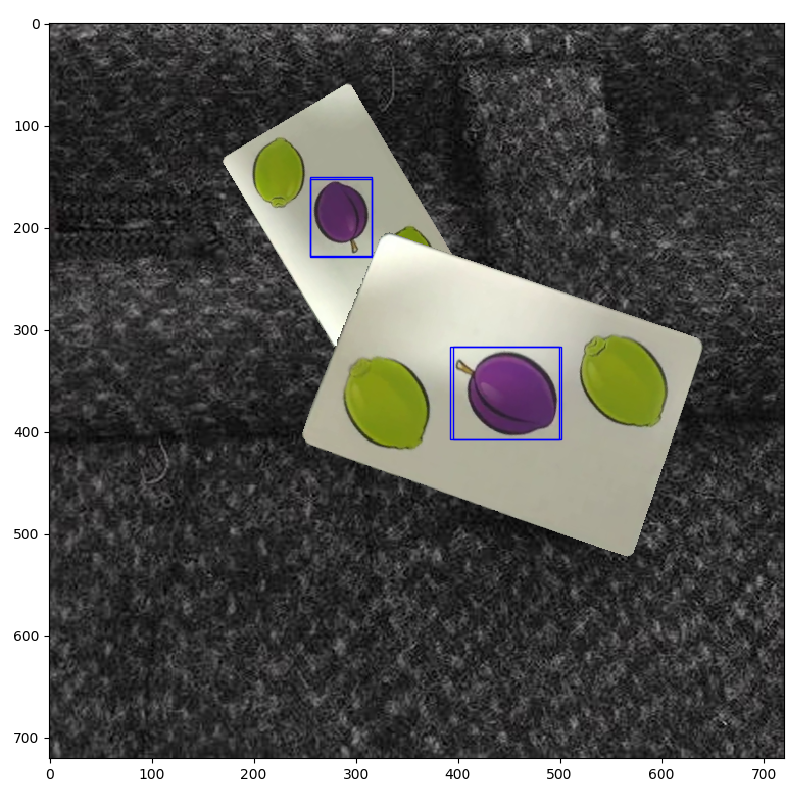
四段以纯色为背景的视频,需要我们依次拍摄以四种水果在中心的卡片,最好持续20s以上以获得最佳效果。
下载数据集:Describable Textures Dataset (DTD).
数据集中有多种多样的背景可供选择。
思路
其实一想到考虑的问题如此之多,我打算放弃用工具直接手动拍个几百来张然后手动标注来着。功夫不负有心人,我找到了playing-card-detection这个用于针对单张扑克牌数据集生成的项目。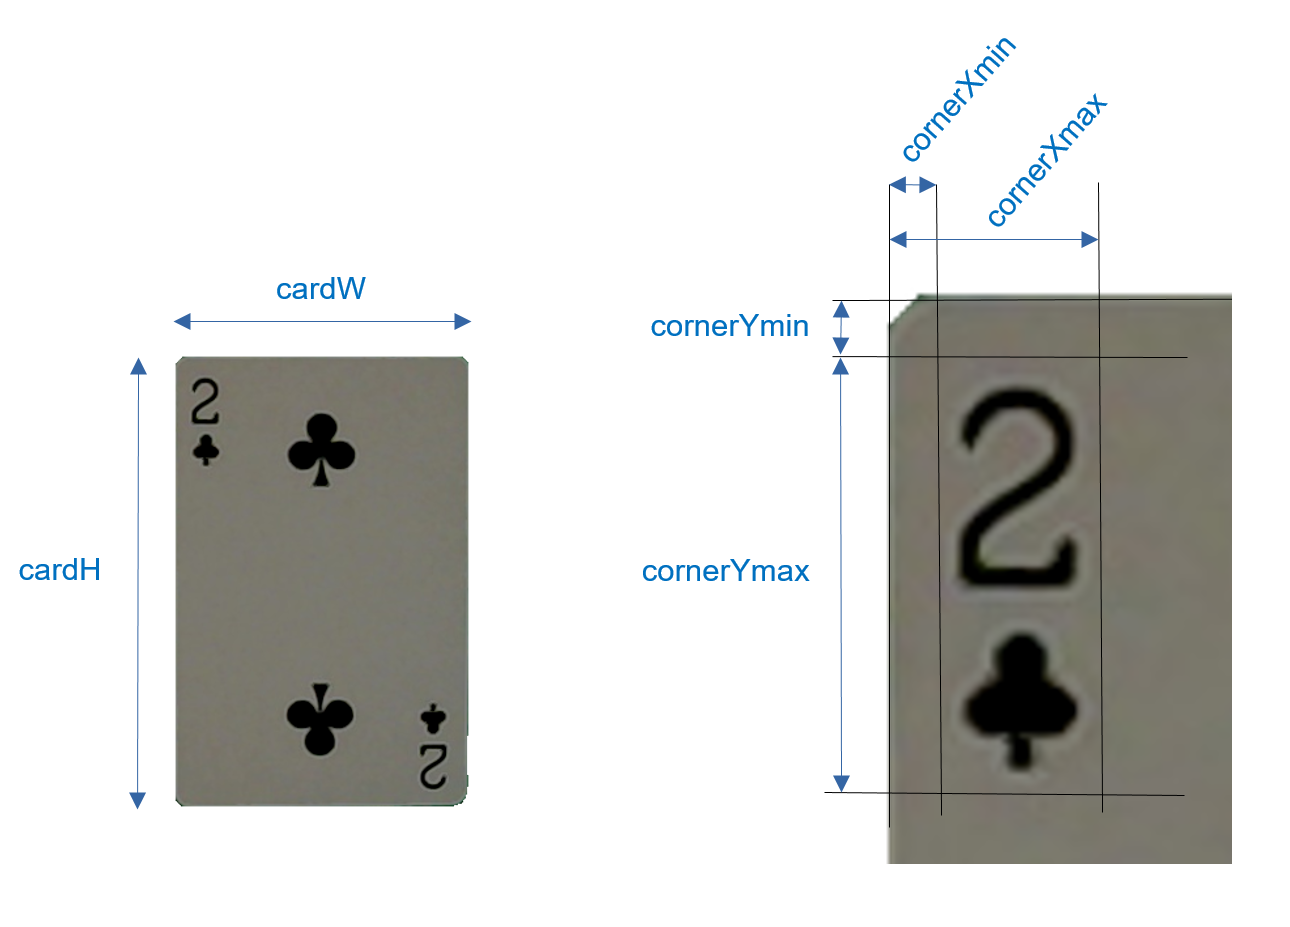
看到这张图我简直抑制不住激动的心情,你是匹配角落里的花色和数字,我是匹配中心的图案,需要修改的只是几个定位参数而已:
# 单位:mm
cardW = 57
cardH = 87
cornerXmin = 17
cornerXmax = 39
cornerYmin = 31
cornerYmax = 60
# 以上数据由手工根据我手中的卡牌大小测量,可适当修改或根据随后debug结果酌情调整
随后的操作基本就是依葫芦画瓢了,有改动的地方我会额外指出。
看着大佬的代码,我们又能学到另一种从单调背景中提取卡片的方法:
def extract_card(img, output_fn=None, min_focus=20, debug=False):

    imgwarp = None

    # Check the image is not too blurry
    focus = varianceOfLaplacian(img)
    if focus < min_focus:
        if debug: print("Focus too low :", focus)
        return False, None

    # Convert in gray color
    gray = cv2.cvtColor(img, cv2.COLOR_BGR2GRAY)

    # Noise-reducing and edge-preserving filter
    gray = cv2.bilateralFilter(gray, 11, 17, 17)

    # Edge extraction
    edge = cv2.Canny(gray, 30, 200)

    # Find the contours in the edged image
    _, cnts, _ = cv2.findContours(edge.copy(), cv2.RETR_EXTERNAL, cv2.CHAIN_APPROX_SIMPLE)

    # We suppose that the contour with largest area corresponds to the contour delimiting the card
    cnt = sorted(cnts, key=cv2.contourArea, reverse=True)[0]

    # We want to check that 'cnt' is the contour of a rectangular shape
    # First, determine 'box', the minimum area bounding rectangle of 'cnt'
    # Then compare area of 'cnt' and area of 'box'
    # Both areas sould be very close
    rect = cv2.minAreaRect(cnt)
    box = cv2.boxPoints(rect)
    box = np.int0(box)
    areaCnt = cv2.contourArea(cnt)
    areaBox = cv2.contourArea(box)
    valid = areaCnt / areaBox > 0.95

    if valid:
        # We want transform the zone inside the contour into the reference rectangle of dimensions (cardW,cardH)
        ((xr, yr), (wr, hr), thetar) = rect
        # Determine 'Mp' the transformation that transforms 'box' into the reference rectangle
        if wr > hr:
            Mp = cv2.getPerspectiveTransform(np.float32(box), refCard)
        else:
            Mp = cv2.getPerspectiveTransform(np.float32(box), refCardRot)
        # Determine the warped image by applying the transformation to the image
        imgwarp = cv2.warpPerspective(img, Mp, (cardW, cardH))
        # Add alpha layer
        imgwarp = cv2.cvtColor(imgwarp, cv2.COLOR_BGR2BGRA)

        # Shape of 'cnt' is (n,1,2), type=int with n = number of points
        # We reshape into (1,n,2), type=float32, before feeding to perspectiveTransform
        cnta = cnt.reshape(1, -1, 2).astype(np.float32)
        # Apply the transformation 'Mp' to the contour
        cntwarp = cv2.perspectiveTransform(cnta, Mp)
        cntwarp = cntwarp.astype(np.int)

        # We build the alpha channel so that we have transparency on the
        # external border of the card
        # First, initialize alpha channel fully transparent
        alphachannel = np.zeros(imgwarp.shape[:2], dtype=np.uint8)
        # Then fill in the contour to make opaque this zone of the card
        cv2.drawContours(alphachannel, cntwarp, 0, 255, -1)

        # Apply the alphamask onto the alpha channel to clean it
        alphachannel = cv2.bitwise_and(alphachannel, alphamask)

        # Add the alphachannel to the warped image
        imgwarp[:, :, 3] = alphachannel

        # Save the image to file
        if output_fn is not None:
            cv2.imwrite(output_fn, imgwarp)

    if debug:
        cv2.imshow("Gray", gray)
        cv2.imshow("Canny", edge)
        edge_bgr = cv2.cvtColor(edge, cv2.COLOR_GRAY2BGR)
        cv2.drawContours(edge_bgr, [box], 0, (0, 0, 255), 3)
        cv2.drawContours(edge_bgr, [cnt], 0, (0, 255, 0), -1)
        cv2.imshow("Contour with biggest area", edge_bgr)
        if valid:
            cv2.imshow("Alphachannel", alphachannel)
            cv2.imshow("Extracted card", imgwarp)

    return valid, imgwarp
与之前项目单纯的我相比,大佬首先检查了图片是否清晰(因为可能从视频中提取的关键帧是模糊的),然后多了降噪和边缘检测部分,专业玩CV的跟我们这种入门爱好者还真是不一样,看来之前那个基于OpenCV检测卡片的项目还能再优化一下。
基于原项目的修改如下:
- 调整上述定位参数。
- 修改了上述卡片检测的阈值min_focus,从120调至20,在我实践过程中清晰的图片focus在50左右波动。
- 删除了扑克列表,加入了如下水果列表。
card_fruits = ['Bananas','Lemons','Strawberries','Grapes'] - 在所有调用了matplotlib.pyplot库的函数末尾加入
plt.show()以便在Pycharm等IDE中即时显示。 - findHull函数使用多边形逼近水果的具体形状,由于角落的扑克标记与水果大小显然不一致,此函数中标注“TWEAK”参数均可根据需要调整,我在此仅调整了` min_hull_area = 2000 # TWEAK, deck and 'zoom' dependant
- max_hull_area = 8000 # TWEAK, deck and 'zoom' dependant`
- 删除了原项目三卡片叠加的操作,因为三卡片叠加时完全会挡住卡片中心的图案,同时修改了叠加卡片的逻辑:
            for i in range(1, 3):
                # smallPoly1: shapely polygon of one of the hull of card 1
                smallPoly1 = kps_to_polygon(self.lkps1[i].keypoints[:])
                a = smallPoly1.area
                # We calculate area of the intersection of card 1 corner with card 2
                intersect = mainPoly2.intersection(smallPoly1)
                ai = intersect.area  # Center intersection area
                if ai != 0:  # Require two center parts can not intersect with each other, even partially
                    invalid = True
                    break
                else:
                    self.listbba.append(BBA(self.bbs1[i - 1], class1))
                '''
                # If intersection area is small enough, we accept card 2
                if (a - ai) / a > 1 - intersect_ratio:
                    self.listbba.append(BBA(self.bbs1[i - 1], class1))
                # If intersectio area is not small, but also not big enough, we want apply new transform to card 2
                elif (a - ai) / a > intersect_ratio:
                    invalid = True
                    break
                '''
被注释掉的部分是原逻辑,显然我们需要的是图案不能有一丝重叠,而不是“轻微的重叠是可以接受的”。
使用方法
由于这份代码比较特殊,原本应该在控制台一步步执行的,我在此项目中将它用py文件包装了,你需要逐个搜索“STEP1”“STEP2”这样我事先添加的注释,去掉它周围的三个单引号注释逐一执行,TEST也是如法炮制。有的STEP只需要执行一次,我也给出了标注。
注意全程需要大量内存,大概像这样,所以至少使用8GB内存的设备执行本代码或者自行删减背景数据集,同时关闭不必要的应用。
总结
看大佬的代码总是愉快的,但如果一直只会看大佬的代码那就永远摆脱不了面对GitHub编程的名号,因此需要不断在大佬代码中学习精华,用到自己的程序中去。
今天累了,学了一整天的MLP还得做笔记,明天可能要做做船模换换脑子。船模的主要配件明天就到,程序都写好了就等实际运行咯!
